Training a YOLO Model to Help Kids Do Math
How I built a custom ML pipeline to train a tile recognition model that runs entirely in the browser: from phone videos to real-time inference on iPad.
One of my projects during the Gauntlet fellowship was a one-week challenge: build an educational game that uses computer vision to recognize physical tiles through an iPad camera. Think OSMO: kids place physical letter and number tiles on a table, the iPad sees them and responds. The goal was to build something like it from scratch.
The app itself was a pretty standard React + Vite project. The interesting part (and the part I learned the most from, by a wide margin) was training the model.

What I was building
The game shows a math problem on screen (something like 3 + 4 = ?), and the child holds up a physical tile with the answer. The iPad camera detects the tile in real-time, checks if it’s correct, and responds with feedback. Five game modes: addition, subtraction, missing part, make 10, and spelling.
The CV model needed to recognize 36 classes: digits 0-9 and letters A-Z. It had to run entirely in the browser. No server, no cloud inference call. The full pipeline: camera frame → Web Worker → ONNX Runtime WASM → detection results, all at 40-80ms per frame on iPad Safari.
I went with YOLO11n (Ultralytics’ nano variant) exported to ONNX format. The nano model is small enough for browser deployment (~10 MB) while being accurate enough for a narrow domain like tiles on a surface.
Why ONNX Runtime over TensorFlow.js? TensorFlow.js has documented WASM threading issues on iOS Safari, and ONNX Runtime’s WebGPU backend crashes WebKit entirely due to a JIT compiler bug. WASM was the only stable inference path on iPad, and ONNX Runtime’s WASM backend with SIMD handled it well.
The first attempt
My first approach was straightforward:
- Film short 10-15 second clips of tiles on my phone. Different lighting, different surfaces.
- Extract frames with ffmpeg at 2 frames per second.
- Upload to Roboflow and manually draw bounding boxes around each tile.
- Export the dataset with Roboflow’s default random split.
- Train a YOLO model locally on my M3 MacBook Pro.
The manual annotation was the bottleneck. Drawing bounding boxes around tiles in Roboflow’s annotation UI takes about an hour per 100 images. For a dataset of 2000 images, that’s 20 hours of clicking.
I got through a smaller batch, trained a 10-class model (digits only), and tested it in the app. The model trained. Loss went down. Metrics looked reasonable.
Then I tested on real tiles and certain characters were unreliable. The “3” was especially bad. So were “7” and “9.”
What was actually wrong
Two bugs. Both silent.
The flip augmentation problem
YOLO’s default training configuration includes fliplr=0.5, which horizontally flips 50% of training images as a data augmentation technique. For most object detection tasks (cars, dogs, furniture) this is standard practice. A flipped car is still a car.
For character detection, it’s a disaster. A mirrored “3” is not a “3.” A mirrored “7” kind of looks like a “1.” A mirrored “9” is a “6.” The model was being trained on invalid examples, and those examples were teaching it the wrong thing.
The part that makes this hard to catch: there’s no signal in the loss curves. Training loss decreases normally. mAP looks reasonable. The corruption only shows up when you test on real tiles and notice that specific asymmetric characters fail disproportionately.
The fix:
yolo detect train \
  data=dataset/data.yaml \
  model=yolo11n.pt \
  epochs=150 \
  imgsz=640 \
  batch=16 \
  fliplr=0.0 \       # this is the line that matters
  flipud=0.0 \
  degrees=10 \
  hsv_v=0.5 \
  close_mosaic=15
Setting fliplr=0.0 disables horizontal flip entirely. I also had to disable it separately in Roboflow’s augmentation settings. The flip was happening in two places.
Data leakage in train/val splits
The second bug was in how I split the data. I was using Roboflow’s built-in random split.
The problem: I’m extracting frames from 10-second video clips at 2fps. Sequential frames are nearly identical: the tile barely moves between frames. A random split puts frame 23 in the training set and frame 24 in the validation set. The model effectively memorizes frame 23 and “passes” on frame 24.
This inflates mAP by 10-20 percentage points. The model appears to generalize, but it’s actually just recognizing images it’s almost already seen.
The fix was a grouped stratified split: all frames from the same video clip stay in the same split. I wrote a custom split script that groups by video prefix and guarantees all 36 classes appear in every split.
Automating the painful parts
After fixing those bugs, I still had the fundamental bottleneck: annotation was too slow, and training was too slow. I automated both.
Replacing manual annotation with Gemini
Instead of drawing bounding boxes by hand, I used Gemini Flash Lite (via OpenRouter) to annotate frames automatically. Send an image, get back bounding box coordinates as structured JSON.
response = client.chat.completions.create(
    model="google/gemini-3.1-flash-lite-preview",
    messages=[{
        "role": "user",
        "content": [
            {"type": "text", "text": ANNOTATION_PROMPT},
            {"type": "image_url", "image_url": {"url": image_uri}},
        ],
    }],
    response_format={
        "type": "json_schema",
        "json_schema": {
            "name": "tile_detections",
            "strict": True,
            "schema": DETECTION_SCHEMA,
        },
    },
    temperature=0.1,
    extra_body={"provider": OPENROUTER_PROVIDER},
)
The extra_body provider pin routes requests to Google specifically. Other OpenRouter providers don’t always support json_schema structured output, and without that guarantee you get malformed responses that look like API errors. The json_schema response format ensures each detection comes back with a label and a [y_min, x_min, y_max, x_max] bounding box normalized to 0-1000. I then convert those to YOLO’s cx cy w h format normalized to 0-1:
def detection_to_yolo(det: Detection) -> str | None:
    if not det.is_valid or det.class_id is None:
        return None

    cx = (det.x_min + det.x_max) / 2 / 1000
    cy = (det.y_min + det.y_max) / 2 / 1000
    w = (det.x_max - det.x_min) / 1000
    h = (det.y_max - det.y_min) / 1000

    return f"{det.class_id} {cx:.6f} {cy:.6f} {w:.6f} {h:.6f}"
Manual annotation: ~1 hour per 100 images. Gemini: ~2000 images in under 30 minutes at comparable accuracy.
One subtle thing I had to get right: separating API errors from empty detections. Both look like an empty list if you’re not careful. But an API timeout is not the same as a frame where no tiles are visible. If you treat them identically, a transient network failure silently creates a false negative in the training data: the model learns “this frame with tiles has no objects.” I tracked errors in a separate file and only wrote empty label files for genuinely empty frames.
Moving training to Kaggle
Training 150 epochs locally on my M3 Pro took about 11 hours. Kaggle’s free P100 GPU did the same run in about 3.3 hours.
The workflow adds some friction: zip the dataset, upload it as a Kaggle Dataset, run the notebook, download the outputs. But 3x faster is 3x faster. I would not recommend training on an M3 mac over Kaggle for anything beyond quick experiments.
The final pipeline
After a few iterations, the pipeline settled into this:
iPad/iPhone video (10-15s clips, varied lighting)
  → ffmpeg frame extraction (2fps)
  → Blur detection + perceptual hash dedup
  → Gemini Flash Lite annotation (structured JSON)
  → Convert to YOLO format
  → QA checks (class distribution, bbox geometry)
  → Upload to Roboflow (augmentation: brightness, exposure, blur, noise; no flips)
  → Grouped stratified split by video prefix
  → Train on Kaggle P100 (150 epochs, ~3.3 hours)
  → Export to ONNX (FP32, opset 17, batch=1)
  → Deploy to browser app
Blur detection needed recalibration. The standard Laplacian variance threshold for blur detection is around 100. For white tile surfaces, I had to drop it to 1.0. White surfaces have inherently low texture, so the variance is low even on perfectly sharp images.
Augmentation made a dramatic difference. With ~1,200 raw images and no augmentation: 0.45 mAP50. With 3x Roboflow augmentation (brightness, exposure, Gaussian blur, noise) on the same images: 0.995 mAP50. The augmentation settings matter though: horizontal and vertical flip must be disabled, and Roboflow’s resize must be set to “Fit (white edges)” instead of “Stretch” to preserve character proportions.
The ONNX export has browser-specific constraints. half=False because WASM doesn’t support float16. opset=17 for ONNX Runtime Web compatibility. batch=1 because we process one camera frame at a time. imgsz=640 because it must match training size exactly.
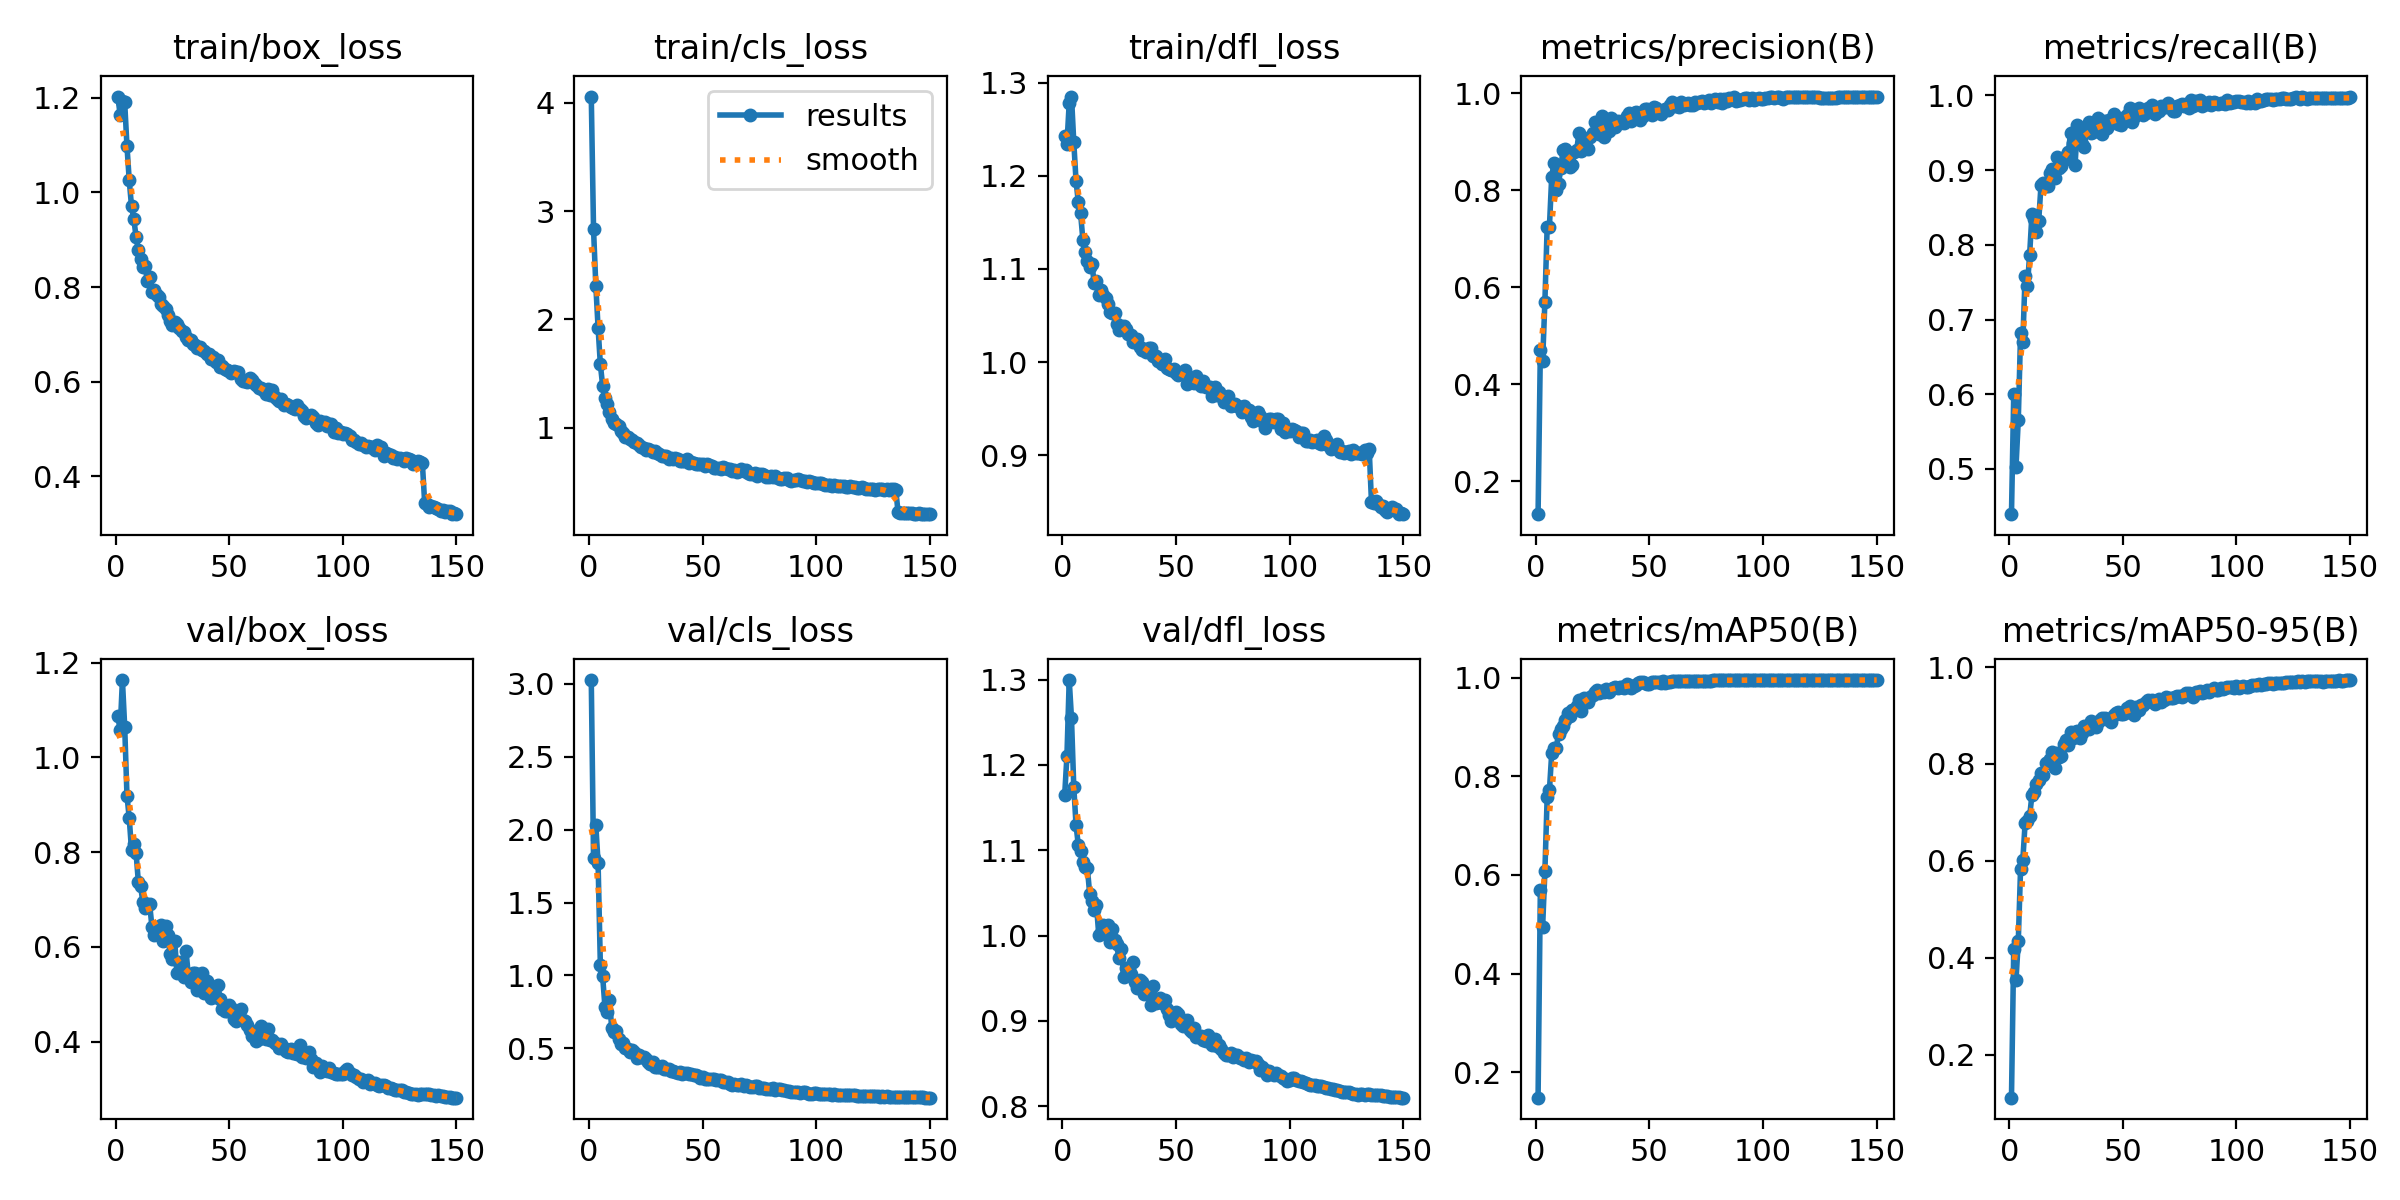
Results
The final model (train3):
- mAP50: 0.995
- mAP50-95: 0.973
- Precision: 0.993
- Recall: 0.998
- ONNX size: 10.6 MB
- Browser inference: 40-80ms per frame on iPad Safari (WASM + SIMD)
The 10 MB model is cached by the PWA’s service worker using a StaleWhileRevalidate strategy: the cached model serves immediately, and a background fetch updates it on the next visit. No versioned filenames needed.
What I learned
Character detection is not generic object detection. Standard YOLO tutorials assume your objects are flip-invariant. For characters, that assumption silently corrupts your training data. The fliplr gotcha alone can ruin a model without any visible signal in your metrics.
Split strategy matters more than model architecture. The jump from random splits to grouped stratified splits (keeping all frames from the same video clip in the same split) had more impact on real-world accuracy than any hyperparameter tuning.
Automate annotation early. Manual annotation bottlenecks everything downstream. LLM-based annotation with structured output was accurate enough for this domain and roughly 40x faster.
The boring infrastructure decisions mattered most. I didn’t spend much time comparing YOLO variants or tuning learning-rate schedules. The things that actually moved the needle were unglamorous: disabling flip augmentation, fixing the data split, calibrating the blur threshold to the actual surface, and telling API errors apart from empty detections. None of it was exciting, and all of it was necessary.
In the end the game shipped with five modes and real-time tile detection, all running offline in the browser. For a one-week build, I was pretty happy with where it landed.
Source code: TileSight app · ML training pipeline